Wage Transfers & Labor Distribution Changes
Labor Distribution refers to the wages and effort of employees (faculty, staff, and students) allocated to a specific funding source, either through a GL Account or Sponsored Research (OGA) Account. Changes to labor distribution should occur prior to wages being accrued and paid to the employee whenever possible, however, when wages are distributed from the incorrect account a wages can be transferred retroactively.
This pages provides guidance for both retroactive wage transfers and future-dated labor distribution changes.
Retroactive Wage Transfer
Wages that have already been paid and posted to an account, require either Finance Centers or Payroll to make the adjustment. These must be submitted through Wage Transfer eForm.
Information required to submit a Wage Transfer:
- Employee Name
- Employee Assignment Number
- Begin Date of the Pay Period(s)
- End Date of the Pay Period(s)
- OSP Grant Manager (if on a PTAEO Account)
- The original distribution account
- The account where the distribution should be posted.
Preparing the Wage Transfer:
Enter in the following fields.
Note: Red asterisks (*) indicates the required fields. Grey text within the field
is guidance for the type and how information should be entered.
- Employee Name*
- Employee Assignment Number (if known this is helpful in ensuring the correct employee is selected).
- Begin Date* of the Pay Period(s)
- End Date* of the Pay Period(s)
- Request on behalf is useful if you are completing the form for another employee
- OSP Grant Manager (if on a PTAEO Account)
- "Transfer From:" will produce a credit transaction line to offset the debit of where
the wages originally charged or posted
- Chart Type*: Select either GL String or PTAEO
- Chart String: Enter string detail of where the wages originally charged
- Amount: Enter the amount to be transferred from the string
- NOTE: If multiple strings are involved for the pay period additional strings can be added by clicking "Add Additional String"
- "Transfer To:" will produce a debit transaction line for where the wages should have
been posted
- Select either GL String or PTAEO
- Enter string detail of where the wages should be charged
- Enter the amount to be transferred to the string
- NOTE: If multiple strings are involved for the pay period additional strings can be added by clicking "Add Additional String"
- Department Administrator Additional Access is for providing individuals with Org or PTAEO access to the form for Org or Award values not provided in the Chart String section
- Other Information
- Reason for Transfer* - Provide a concise explanation to why the wage transfer is being done.
- Additional questions are required when a wage transfer (non-simple re-class) involves
sponsored research dollars (OGA/PTAEO Accounts).
Wage Transfers within 90 days require Questions 1 & 2 adequately answered:
1) Why was this transaction(s) originally posted to the account from which it is now being transferred?
2) Why should the transaction(s) be transferred to the proposed account to be charged? How does this transaction benefit the Project?
Wage Transfers OVER 90 days require Questions 3 & 4 adequately answered (these transfers over 90 days will be denied, unless their are extenuating circumstances)
3) If over 90 days, why is the transaction(s) being transferred more than 90 days after the original date the transaction was recorded?
4) If over 90 days, what corrective action has been taken to eliminate future need for wage transfers of this type?
- Attachments
- Provide supporting documentation for the transactions that are being moved. This would provide confirmation that the original charge hit the account you are ‘Transferring From’. (i.e., copies of the IRA Transaction Report, Labor Distribution Report)
- How do I ‘Attach Supporting Documentation’?
-
-
-
- Click 'Add and Remove Attachments'
- Select a Document Type from the available list
- Always choose ACCT – SPUD Journal when uploading the excel Simple Re-class SPUD Journal and the excel Cost Transfer SPUD Journal
- Always choose ACCT – Financial Reports when attaching IRA Reports, invoices … etc.
- Browse to your attachment
- Upload
- Select Done when all attachments are uploaded
If you need to add more additional documents repeat the steps
-
-
-
- Approvals
- E-Forms can be routed to single or multiple Approvers
- Begin typing last name in the Approver field, once the name appears in the list click on it to enter it.
- Click Add This Approver at the bottom of the form
- To add an additional Approver repeat the steps above
- Select the sequence of approvers in which you want the e-Form to be routed to (first, second, third, etc.)
- Once the e-Form is submitted, the approver(s) you added will receive an email notification requesting their review & approval
- Following their approval, the e-Form will be routed to the next approver and then onto OSP/Finance Center for final review/processing
- Who needs to approved when a PTAEO string is involved:
- Simple Re-class Wage Transfer:
- OSP Sponsored Research Manager - Add their name at the top of the form as OSP Grant Manager and in the Approver section
- Wage Transfer (Non-Simple Re-class) within 90 days:
- Principle Investigator(s)
- OSP Sponsored Research Manager - Add their name at the top of the form as OSP Grant Manager and in the Approver section
- Wage Transfer (Non-Simple Re-class) OVER 90 days:
- Principle Investigator(s)
- OSP Sponsored Research Manager - Add their name at the top of the form as OSP Grant Manager and in the Approver section
- Director of OSP or OSP Assistant Director, Post Award or OSP Operations Manager
- Simple Re-class Wage Transfer:
- E-Forms can be routed to single or multiple Approvers
Future Dated Labor Distribution Changes
MYLS (My Labor Schedule) eForm or system is used to capture situations when employee wage charges will move from one labor account to another at some defined date in the future. These proactive updates help to ensure that labor accounting and budgeting are accurate.
There are two ways to process future dated labor schedule changes:
- If you have access to MYLS (My Labor Schedule) system, you may direct enter labor schedule changes.
- Submit through MyLS eForm to have your finance center enter the labor schedule changes for you.
To assist in maintaining proper backup of approvals and document retention, an eForm can be used in either case.
To process a MYLS change (eForm):
- Open a new MYLS eForm from the Finance Forms Library website
- Complete the MYLS eForm.
- Route the approval to the PI on the grant or GL account.
- If you are submitting this to your finance center, you are finished and can submit the eForm. If you plan to do the MYLS change manually, proceed to step 5.
- In the “comments” section, write a note to the Finance Center that this is for approval backup purposes only, and the department will process the change. Submit the eForm.
To process a MYLS change within the Oracle E-Business Suite:
- Log-in to Oracle E-Business Suite
- Click on the MYLS link on the left-hand menu
- Select Labor Schedules from the menu
- Use the flashlight icon to search for a person
- Locate the correct assignment that you are attempting to change
- Click Schedule Lines
- Make the appropriate changes to the accounts
- In the comments section of the reason field, reference the OnBase eForm number from above
- When all changes are made, hit "Save"
Detailed Instructions for using the MYLS system.
Click Dartmouth MYLS (followed by your org).
NOTE: You will not see as many options as this page indicates as you are only allowed access to the org you are assigned to.
There are four steps to changing a labor schedule
- Make sure you have the proper backup
- End date the strings no longer valid
- Enter the new strings
- Save the changes.
Click Labor Schedules to enter a labor schedule. (Alt+O)
Click on the flashlight, in the upper left corner gray bar, to enter a person’s name or employee number.(Alt+V, F)

There are two ways you can find an individual.
- To locate by Name: (There are at least three ways to enter an individual’s name.)
- Enter a part of their last name followed by a percentage sign (ie: Woo%)
- Enter their full last name, comma, space, and part of their first name followed by a % sign. (ie: Woogie, B% ).
- Enter their full last name, comma, space and then their full fist name and % for middle initial. (ie: Woogie, Boogie%)
- Then click Find (Alt+I)

- Locate individual by Employee Number – enter the first digits of the assignment – do not include alpha values, the dash or the number following the dash (for example: the assignment number is P19682-6, enter only 19682).
-
- The click Find (Alt+I)

- The click Find (Alt+I)
After you have found the person, the labor schedule screen will show a list of their
assignments.
Click in the blank gray box next to the correct full assignment number. This is indicated in the above screen as the dark blue color in the box.
Click the “Schedule Lines” tab to bring up their labor schedule. (Alt+S)
This is the screen where changes to labor schedule are entered. Before entering new
distribution lines you must end date the account string(s) that are no longer in effect.
Enter the end date under “end date” – keep in mind the “Payroll” type (biweekly/ monthly) when determining dates. As you cannot end date a labor schedule prior to the last day of the last payroll processed for this type of person (biweekly/monthly).
Even if you are leaving the account number the same but changing the percentage you will need to end date that line and create a new line.
TIP: If the account string and percentage are not changing at all then you do not have end date that information.
The below screen shot is of a monthly paid individual. The screens are the same for
monthly and biweekly paid people. The only difference is the wording in the block
next to “Payroll”. This block indicates the payroll type of the individual and will
either state “Calendar Month” or “Bi-Week”. All changes to labor schedule follow
the same steps.
Note: Ch'Cha, Cha is displayed on this page only so that you can see the in the payroll box it stated "monthly" whereas Woogie, Boogie on previous page states "bi-weekly".
To end date a string you click into the "End Date" box and enter a date (see example
below). Remember that you cannot end date a labor schedule for a date prior to the
last pay period end date for that individual.
The following error message and how to use that message to your advantage.
If you try to end date a labor schedule by using a date prior to the pay period end date that they were last paid on you will receive the following pop-up: "End date of a schedule line must be greater than the last payroll process date of DD/MMM/YY). In this case for example purposes only – the date states 05-Jun-10. This means that you cannot use date that is prior to that date being displayed.
Your new schedule can only start on the following date (06-jun-2010 in this case).
After end dating the string(s) new strings must be entered. To enter a new string either
- use the down arrow key to the next blank line or
- click onto a line and then click the green “+” key in the gray HRMS menu. This will open a blank line for you.
To enter a GL string:
- Click onto the block located under the heading of “GL Account”
- You can enter a GL string one of two ways: (one string per line)
- Type each segment with a period between the segments (ie: 30.023.286118.594500.0000.6161)
- Or click the little box on the right hand side of the GL block (this has three dots
on it). This will bring a pop up screen that allows you enter segments without periods.
Screen shot of option (b)
If using this pop up screen to enter the correct number of digits for the segment and the system automatically will move to the next segment block. When the full string is entered you can hit 'enter', click on "OK", or use Alt+O.
NOTE: Because these account string fields are shared with the GL, the natural class is a required field. However, when the LD processes run the system looks at the type of employee and type of payment and will assign the appropriate natural class regardless of what was entered.
- Hit Tab
- Enter the "Change Reason" – this is mandatory – it is NOT optional.
- Use the 'luv' button at the end of the "Change Reason' box to pick an option.
- This box is required for auditing purposes and to let your fiscal officers know the reason for the change.
- The "change Reason Detail" box is for your use to help explain the change. You can
type up to 250 characters excluding the use of the '&' sign. Use of this sign will
cause the MYLS reports to error.
- Use of this box assists both fiscal officers, auditors, and others understand the change.
- Hit Enter or click the OK button. (Alt-O)

- Enter the start date and enter in dd/mmm/yy or dd/mmm/yyyy. The month is the first three characters of the month (ie: August = Aug). The start date needs to equal the day after the date you entered to end the old one.
- Tab to the end date and enter it if known. If there is no end date or one is not known – you can leave this blank and tab to the percentage block.
- Enter the percentage – the total for all strings must be equal to 100%.
- Click the save button (yellow disc on the main top menu).

Note: If the string is staying the same and you are just changing the percentage you can open a new line under the old string and click shift-F5. This will copy the string in the block above into that new block. Then continue as normal with step 3 above.
IMPORTANT NOTE: If the assignment has an end date, in the "END" box under the payroll type, you will need to make sure all strings that are open have an end date of at least equal to the assignment end date. If no end date is entered than the GL string will be encumbered to the end of the fiscal year.
IMPORTANT TIP: percentages cannot have more than two decimal places.
To Enter a PTAEO:
Note: To enter Grant string you follow the same steps except that you will use the
Project, Task, Award, Org, and Expenditure blocks verses the gl block.
On the first blank line (or created blank line) either tab or click onto the block with the heading “Project”.
Enter the Project number and tab.
If the system will not allow you to enter the Project, task, or award then it means that that particular segment is not valid in the payroll system. That the grant may not have been created by OSP/OGA yet or that that grant is closed. You can contact your OSP manager for details.
Enter the Task number and tab.
Enter the Award number and tab.
In the Organization block, enter in the Alpha value of the org value - LD does not recognize the numeric value of an org – it only recognizes the alpha value.
You can type in part of the alpha value and a pop-up screen will display in which
you can click the correct org, hit enter and the system will place that value in the
org cell.
TIP: Because these account string fields are shared with OGA, the natural class is a required field. However, when the LD processes run the system looks at the employee attributes and assigns the appropriate natural class regardless of what was entered.
NOTE: The only information that is transferred to OGA is the Project, Task, Award, and Expenditure type. There is an OGA process that assigns the correct Org value for the grant if you enter an incorrect one.
Tab to expenditure and enter the expenditure value.
Enter the Change Reason & Change Reason Detail for the same reason as for the GL strings.
Enter the Start date (same rules apply as with GL strings)
Enter the End date if known (same rules apply as with GL strings)
Enter the percentage.
Save. (Alt+F, S)
If an end date is not entered on a PTAEO string that is on or before the Project, Task or Award expired three pop-ups will be displayed. An example of the pop-ups is displayed on the following page. These pop-ups are warnings and are embedded in the Oracle software and cannot be removed. Your fiscal office may have a policy regarding this issue.
When you save you will see the following message at the bottom of the screen: “FRM-40407 Transaction complete: applied records saved”
Click the small “x” in the right upper hand corner of the above screen to exit. (Alt+F4)
IMPORTANT NOTE: If the assignment has an end date you will want to make sure all
strings have an end date of at least equal to the assignment end date. If no end
date is entered than the PTAEO string will be encumbered to the end of the project
year.
The other two pop-ups will appear to be the same – but read:
“Task is not valid for the schedule line dates”
“Award is not valid for the schedule line dates”
Again these pop-ups are bringing to your attention that the schedule is going out beyond the PT and/or A dates of the grant.
To change another labor schedule click the flashlight and repeat the steps outlined
in these instructions. (Alt+V, F)
Troubleshooting:
Total Schedule for assignment is < 100%:
There are two possible reasons for this message: In both cases (displayed below)
click the OK button and go back into the labor schedule form.
Manually calculate the valid percentages that you entered into the system.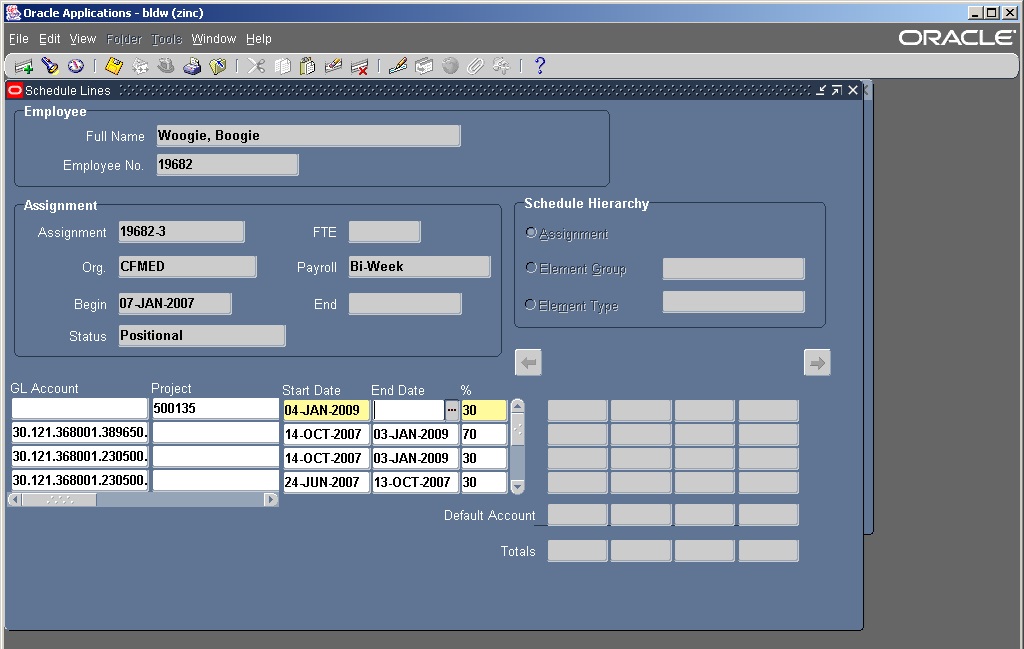
In this case:
The message displayed because the labor schedule only equals only 30% of the individuals pay. The remaining 70% needs to be accounted for. If the remaining 70% is not accounted for than this amount of the distribution will automatically go to the suspense account that is associated with the assignment org – in this case “CFMED”.
Labor schedules need to be 100%
Reason #2:
In this case the pop-up occurred because 30% of the distribution has an end date while the remaining 70% does not. Therefore the labor schedule is not 100% at all times.
In this case:
- Leave the labor schedule as is – knowing that starting on July 1, 2009 that 30% of the distribution will be hitting the departmental suspense account.
- Remove the end date of the 30% knowing that this 30% will be charged to your departmental suspense account once the end date for either the P, T, or A has arrived unless you enter a valid string before then.
- Enter a new string to start 7/1/09 for the 30%.
Note: Your department may have a procedure for how they wish you to handle this situation.
Labor Schedule at Assignment hierarchy exceeds 100%: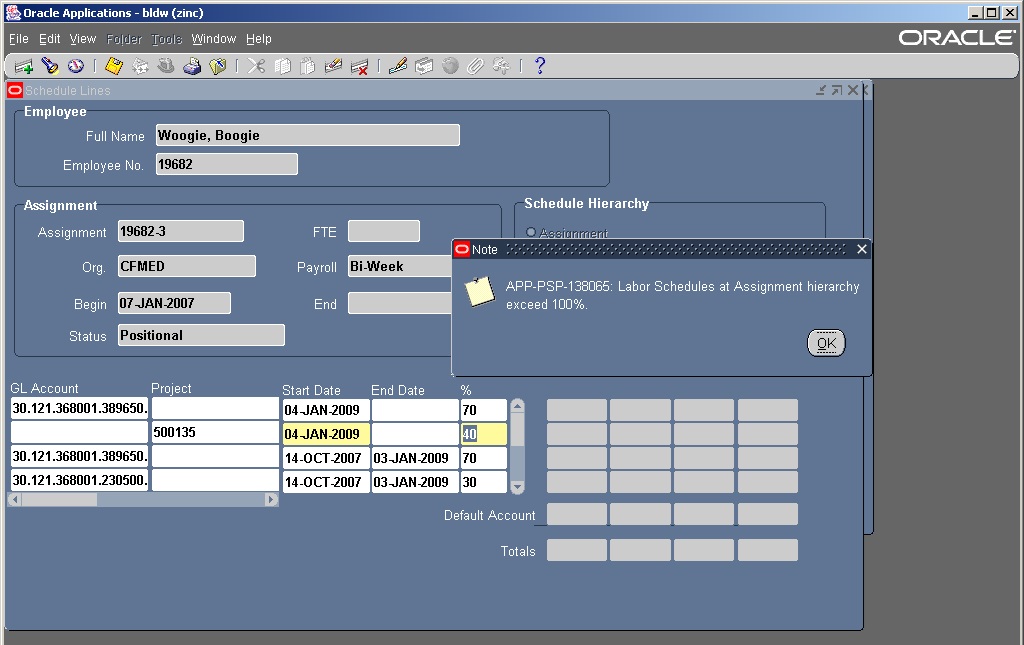
In this case:
- The labor schedule actually is equal to 110%. Click ok – and fix the percentages to equal 100%.
- Save.
- Exit and continue working.
Values have not been entered for one or more required segments.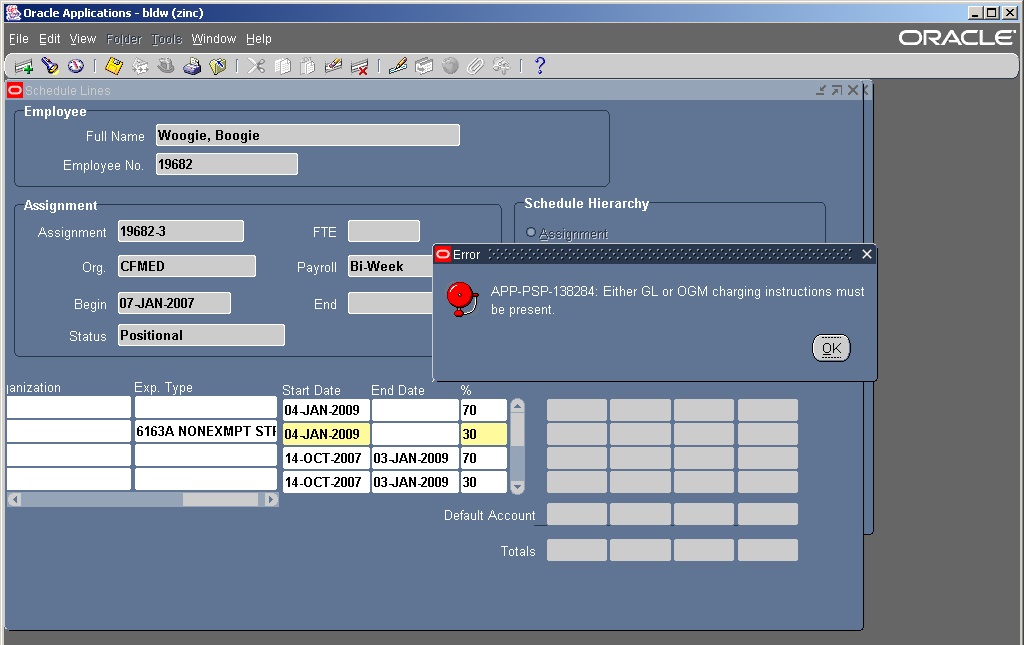
If you tab to start date after entering PTAEO and receive this pop-up – it means that one of the segments (Task, Exp, Org value) was not entered.
In this case:
- The Org value was left empty.
- Click “yes” and
- Then using the slide bar under the labor schedule list, slide the bar slowing to the left to see what segment was missed.
- Enter the segment or segments that are missing.
- Save and exit.
Enter a project, task, or award but you cannot tab to the next block.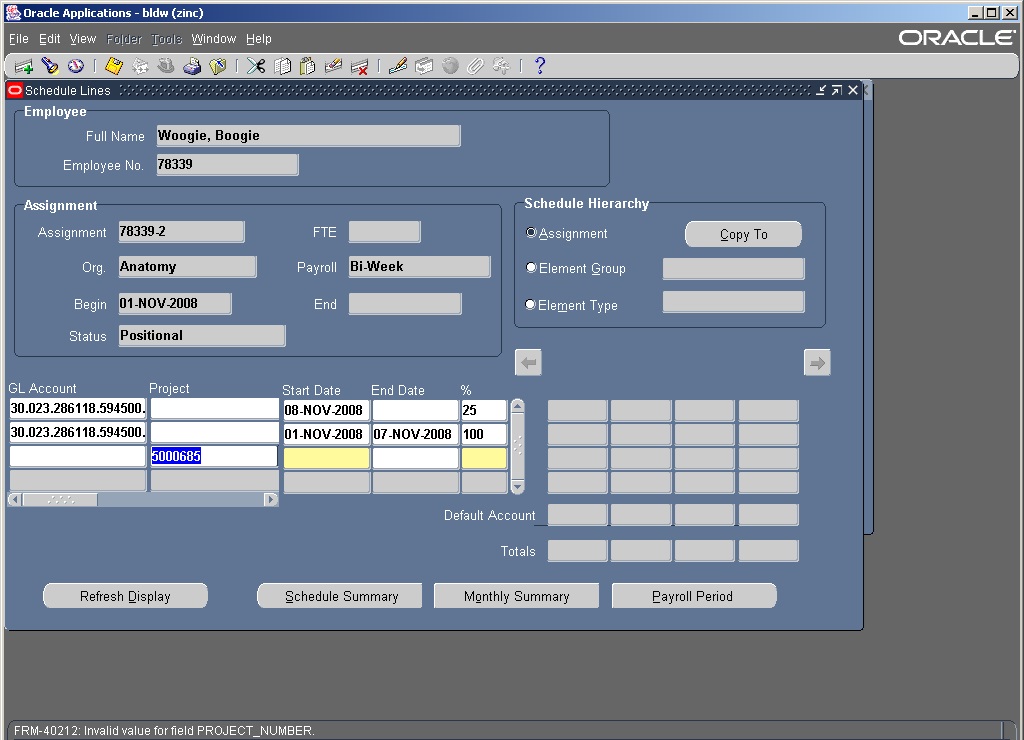
- At the bottom of the screen you will see a in small white letters a note that states
“invalid value for field PROJECT_NUMBER”. Double check the number – were too many
numbers entered?
- If yes, just type over the value and continue as normal.
- If the right number of digits were used – then the system is telling the user that as of that moment the Project is not valid. You will have to contact your OSP manager.
- You may also come across this issue with the task or award with the message stating TASK or AWARD verses PROJECT. The system will not allow you to proceed with a PTA beyond that part that is invalid.
The system will not let me use the end date that I want to.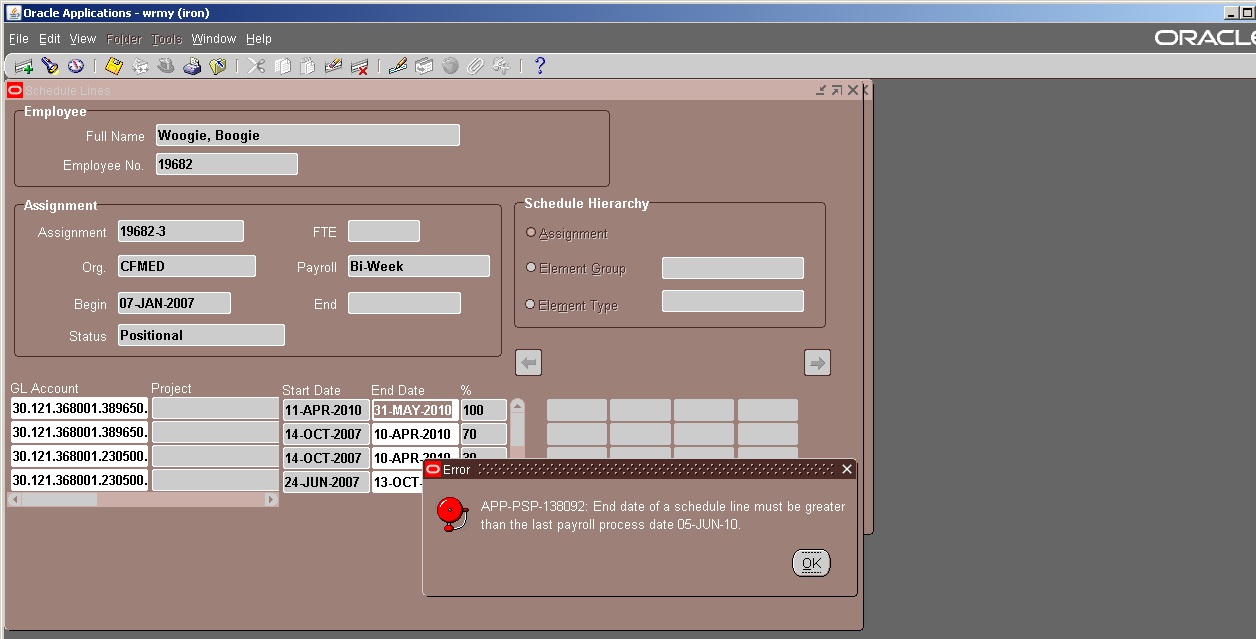
If you try to end date a labor schedule by using a date prior to the pay period end date that they were last paid on you will receive the following pop-up:
"End date of a schedule line must be greater than the last payroll process date of DD/MMM/YY)."
- In this case for example purposes only – the date states 05-Jun-10. This means that you cannot use date that is prior to that date being displayed.
- Your new schedule can only start on the following date (06-jun-2010 in this case).
Q&A:
I have someone who is being charged to expenditure/ natural class 6024 and I entered them to be 6163 in their labor schedule. Why are they still hitting 6024?
- You can not change a person’s natural class with a labor schedule change. You will need to review the PA you submitted on the individual – as the information that is provided on the PA dictates the natural class. When we import payroll the system does its job properly by overriding a natural class in the system with the correct natural class based on their assignment attributes.
Who do I call if I need help?
- Contact your Finance Center. They may ask that you send them a screen print and describe exactly what you were doing and trying to do. They may ask that you exit from the labor schedule screen as only one person can be in it at a time. Each instance is handled differently.
I am not allowed to go into my MYLS responsibility or it does not display on my screen. Why?
- If the answer is 'No' to either of these questions then contact your fiscal officer
to see if they will process the correct paperwork.
- Have you been granted permission and the proper authorization forms submitted?
- Have you completed training?
- If the answer is 'Yes' to the above two questions.
- Did you receive the MYLS email stating that you had to be out of the MYLS responsibilities
because of importing?
- If yes to this question – then you are temporarily blocked for updating any labor schedules until the payroll importing is complete and you receive the message stating that your 'MYLS' responsibility has been enabled.
- If the answer is 'NO'.
- Did your fiscal officers request that you be disabled?
- You can contact the LD accountant.
- Did you receive the MYLS email stating that you had to be out of the MYLS responsibilities
because of importing?
I cannot find the person or assignment – why?
- Is the person's assignment on their HRMS record in your org?
- If no, then you cannot change their schedule.
- If yes, are they still existing employee (not termed)?
- If yes, contact the LD accountant.
- If no – then you will not see them.
